


Causes and Remedies of Blown Plaster
Posted on 17th January 2024 at 13:47
Blown plaster can be a persistent problem for homeowners, manifesting as cracks, bubbles, or flaking on walls. In this guide, we'll delve into the root causes of blown plaster and equip you with comprehensive remedies to restore the integrity of your walls.
Causes of Blown Plaster
Moisture Infiltration
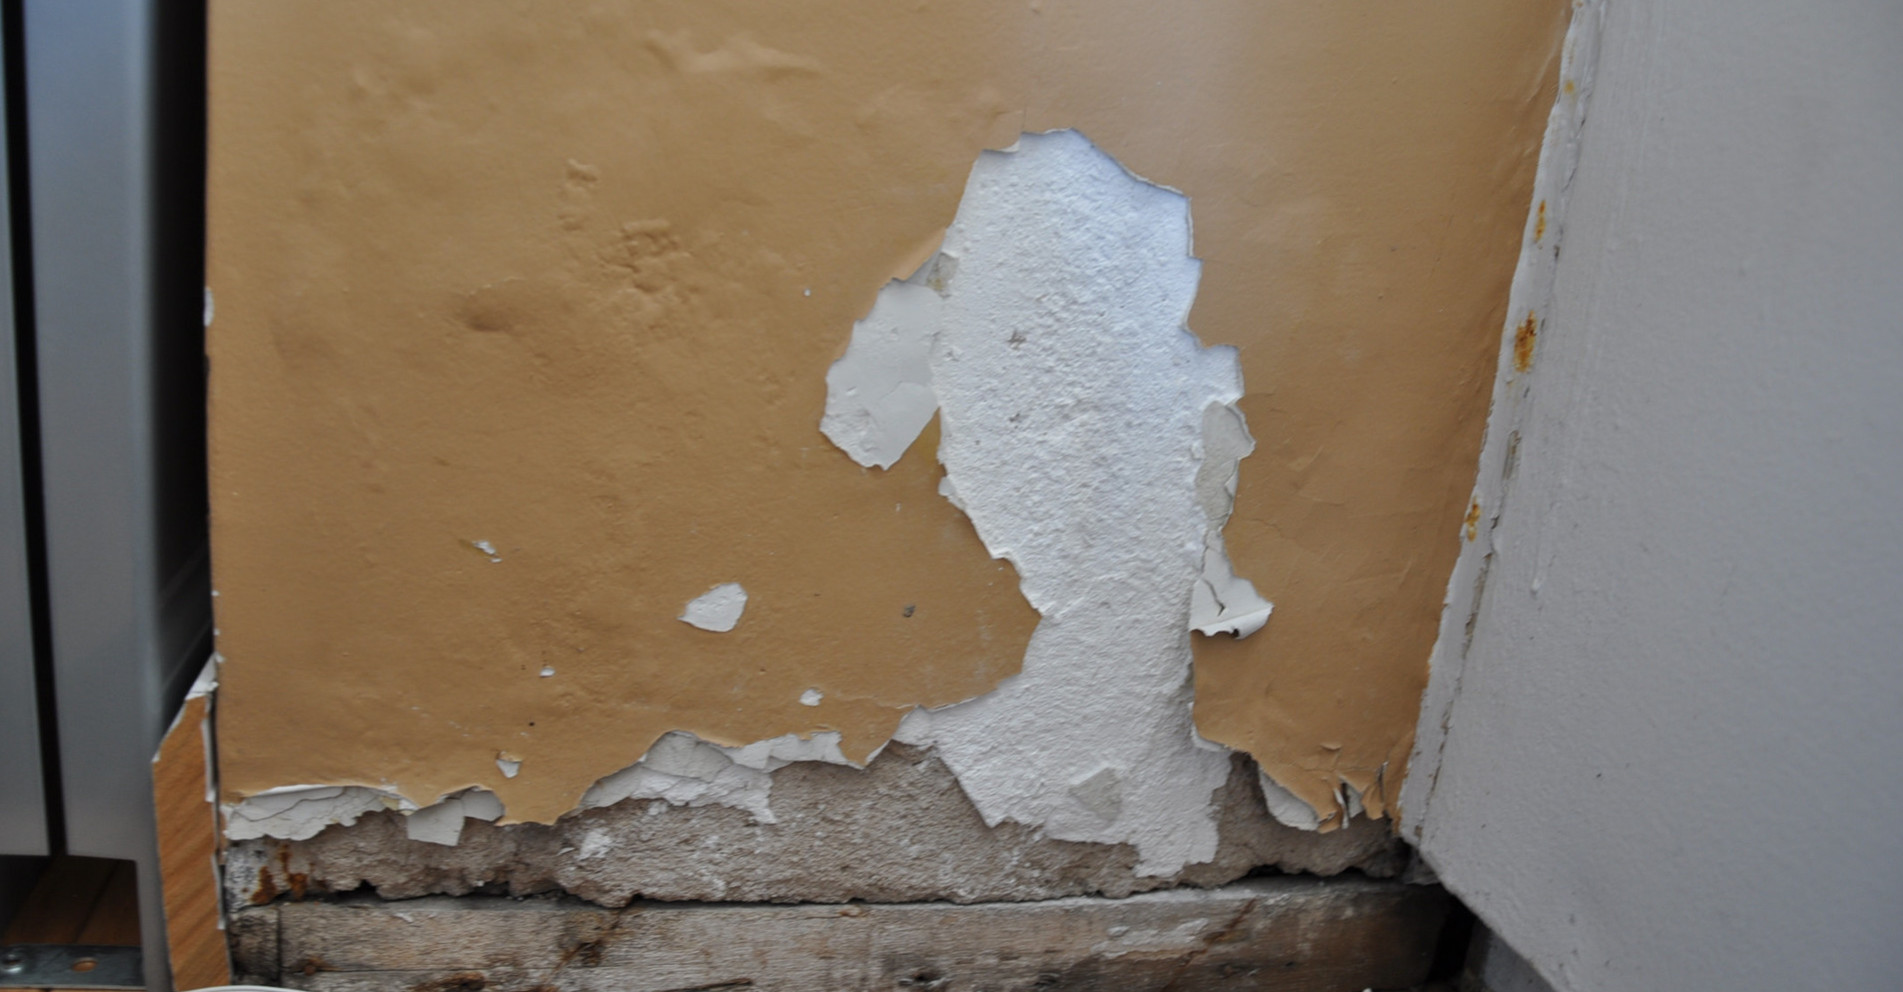
Moisture infiltration into plaster walls occurs when water penetrates the wall surface and is absorbed by the plaster material. This intrusion can lead to various forms of damage, affecting both the aesthetics and structural integrity of the wall.
When water permeates the plaster, it disrupts the bonding between the plaster particles. Over time, this weakens the structural integrity of the plaster, making it more prone to cracks, crumbling, and detachment from the underlying surface.
Moisture trapped within the plaster can cause it to expand and contract, especially during temperature fluctuations. This expansion and contraction result in visible cracks on the surface, and in severe cases, bubbles or blisters may form as the water vapor tries to escape.
Moist conditions within the plaster create an ideal environment for mold and mildew to thrive. Mold not only damages the plaster but can also pose health risks and necessitate extensive remediation efforts.
Water-soluble salts present in the plaster may dissolve in infiltrating water, leading to unsightly stains and discoloration on the wall surface. These stains can be challenging to remove and may require thorough cleaning or, in extreme cases, repainting.
Prolonged moisture exposure can extend beyond the plaster, affecting the underlying structure. Wooden framing or metal elements within the wall may corrode or rot, compromising the overall stability of the wall.
As moisture travels through the plaster, it can carry soluble salts to the surface. When the water evaporates, these salts crystallize, forming a powdery, white substance known as efflorescence. This not only mars the appearance but signals ongoing moisture issues.
Preventing and Addressing Moisture Infiltration
Regularly inspect and maintain the building, ensuring proper sealing around windows, doors, and other openings. Address plumbing leaks promptly to prevent water from seeping into the walls. Install adequate ventilation systems to reduce humidity levels within the building.
In summary, moisture infiltration into plaster walls induces a cascade of detrimental effects, ranging from aesthetic issues like staining to structural problems such as weakened plaster and supporting structures. Identifying and addressing the sources of moisture promptly is crucial to preserving the longevity and appearance of plaster walls.
Poor Installation
Poor application of plaster to walls can result in various problems that not only compromise the aesthetics but also impact the overall durability and functionality of the wall surface. By understanding the potential problems associated with poor plaster application and taking preventive measures, you can ensure a more durable, visually appealing, and long-lasting plaster finish on your walls so here are the problems associated with improper plaster application and tips on how to avoid them:
1. Lack of Adhesion:
- Problem: Insufficient bonding between the plaster and the substrate leads to a lack of adhesion.
- Solution: Ensure that the wall surface is adequately prepared by cleaning, priming, and, if necessary, applying a bonding agent before plastering.
2. Cracking:
- Problem: Inadequate mixing, incorrect application thickness, or insufficient curing can result in cracks in the plaster.
- Solution: Follow manufacturer guidelines for mixing ratios, apply plaster evenly and at the recommended thickness, and allow sufficient curing time. Consider reinforcing with mesh in high-stress areas.
3. Uneven Surface:
- Problem: Irregular application leads to an uneven surface with lumps, bumps, or hollow spots.
- Solution: Use proper plastering techniques, including maintaining a consistent thickness, using straight edges or trowels, and smoothing the surface during application.
4. Shrinkage and Sagging:
- Problem: Plaster can shrink during drying, leading to a less cohesive surface. Additionally, improper application may cause sagging.
- Solution: Follow the recommended drying times between coats, and apply plaster evenly to prevent sagging. Consider using plaster mixtures designed to minimize shrinkage.
5. Surface Imperfections:
- Problem: Poor workmanship can result in surface imperfections like trowel marks, bubbles, or inconsistent texture.
- Solution: Develop proper plastering skills, including using the right tools, maintaining a consistent technique, and addressing imperfections promptly during the application process.
6. Premature Cracking:
- Problem: Rapid drying due to factors like high temperatures can cause premature cracking.
- Solution: Control environmental conditions, such as temperature and humidity, during plaster application. Consider using additives to extend drying times and reduce the risk of premature cracking.
7. Lack of Durability:
- Problem: Poorly applied plaster is more prone to damage and wear over time.
- Solution: Invest in skilled and experienced plasterers, follow best practices for application, and use high-quality plaster materials for enhanced durability.
Tips to Avoid Poor Plaster Application:
- Hire experienced and skilled plastering professionals for the job.
- Follow manufacturer guidelines for plaster mixing, application, and curing.
- Adequately prepare the wall surface before plastering, addressing any issues like dampness or contamination.
- Use the right tools and techniques for a smooth and consistent application.
Structural Movement
Structural movement can cause blown plaster by inducing stress on the wall surfaces, leading to cracks, detachment, and other forms of damage. Here's an explanation of how structural movement impacts plaster with some potential remedies:
1. Settlement:
Newly constructed buildings may experience settlement as the soil underneath adjusts. This settling can cause cracks in the plaster, especially near doors and windows.
Remedy - Address underlying soil settlement issues and repair cracks using flexible fillers that can accommodate minor movements.
2. Foundation Issues:
Uneven settling, shifting soil, or foundation problems can lead to structural movement. This uneven foundation movement may result in distorted walls, causing plaster to crack or detach.
Remedy - Address foundation issues with professional assistance and repair damaged plaster after stabilizing the foundation.
3. Thermal Expansion and Contraction:
Fluctuations in temperature can cause materials to expand and contract. Walls expanding and contracting with temperature changes may stress the plaster, leading to cracks.
Remedy - Use expansion joints to accommodate thermal movement. Apply flexible coatings or additives to the plaster to enhance its ability to withstand temperature variations.
4. Subsidence:
Soil movement due to factors like mining activities or underground water fluctuations can lead to subsidence. Subsidence may cause walls to shift, resulting in plaster cracks and detachment.
Remedy - Address the underlying cause of subsidence, stabilize the soil, and repair plaster using flexible materials to accommodate ongoing movements.
5. Vibration:
External factors like heavy traffic, nearby construction, or industrial activities can introduce vibrations. Continuous vibrations may weaken the plaster, causing it to crack or detach over time.
Remedy - Minimize vibration sources where possible. Use flexible materials or reinforcing mesh during plaster application to enhance its resistance to vibrations.
Remedies for Blown Plaster due to Structural Movement:
- Conduct a thorough assessment to identify the specific structural movement causing plaster damage.
- Stabilize the underlying structural issues, whether related to settling, foundation problems, or seismic activity.
- Use flexible fillers or materials during plaster repair to accommodate ongoing movement.
- Consider installing expansion joints in areas prone to thermal expansion and contraction.
By addressing the underlying causes of structural movement and implementing appropriate remedies, you can mitigate the impact on plaster, preserving the integrity of your walls and minimizing the risk of blown plaster. However consulting with structural engineers or professionals may be essential for a comprehensive solution.
Freeze-Thaw Cycles
Addressing the impact of freeze-thaw cycles on plastered walls requires a combination of preventative measures, regular maintenance, and targeted repairs. By understanding the specific vulnerabilities of plaster in freezing conditions, homeowners can take proactive steps to preserve the integrity of their walls.
Freeze-thaw cycles can contribute to the breakdown of the plaster surface. Repeated freezing and thawing can also cause plaster to crack as water can be absorbed by the plaster during thaw cycles. This absorbed water can freeze during colder cycles, causing expansion. The expansion and contraction of this water within the plaster during freeze-thaw cycles can lead to cracking. Over time, repeated cycles can exacerbate cracks, compromising the integrity of the plaster and constant expansion and contraction weaken the surface, resulting in flaking, peeling, or a powdery texture.
Water carrying soluble salts within the plaster may also reach the surface during thawing and as the water evaporates, the salts crystallize, forming efflorescence on the plaster surface, further degrading its appearance. Freeze-thaw cycles can also compromise the adhesion between layers of plaster. This loss of adhesion may lead to sections of plaster detaching from the wall.
Remedies for Freeze-Thaw Cycle Damage on Plastered Walls
1. Repairing Cracks
Identify and repair existing cracks promptly by cleaning out the cracks, apply a suitable filler or patching compound, and smoothen the surface. Consider using materials with flexibility to accommodate future movements.
2. Waterproofing
Improve the water resistance of the plaster by applying a waterproofing agent or sealant to the plaster surface. Ensure proper drainage to minimize water absorption.
3. Insulation
Reduce the impact of temperature fluctuations by enhancing wall insulation to regulate temperature changes and minimize the effects of freeze-thaw cycles on the plaster.
4. Expansion Joints
Allow for controlled movement by introducing expansion joints in strategic locations to accommodate the expansion and contraction without causing stress on the plaster.
5. Proper Ventilation
Manage moisture levels within the wall by ensuring proper ventilation to reduce humidity. Moisture management can mitigate the adverse effects of freeze-thaw cycles.
6. Frost-Resistant Plaster Mix
Use materials designed to withstand freeze-thaw conditions. Opt for plaster mixes with additives or properties that enhance resistance to freeze-thaw cycles.
7. Regular Maintenance
Proactively address issues to prevent further damage by conducting regular inspections, especially after extreme weather events, and promptly repair any identified damage to the plaster.
8. Professional Assessment
Seek expert advice for severe damage. If the damage is extensive, consult with professionals, such as structural engineers or plastering specialists, for a comprehensive assessment and appropriate remedies.
Remedies for Blown Plaster
Remedying blown plaster involves addressing the underlying causes of the damage and implementing appropriate repairs to restore the integrity of the wall surface. Detecting early signs like hairline cracks, bubbles, or a hollow sound when tapping the wall are some of the signs to look out for and acting promptly upon identifying these signs, addressing minor damages before they escalate can save alot of time, money and headache.
Here are our effective remedies for dealing with blown plaster:
1. Identify and Address the Root Cause - Conduct a thorough inspection to identify the underlying cause of the blown plaster, whether it's moisture infiltration, structural movement, or poor application. Resolve the root cause, such as fixing leaks, stabilizing the structure, or rectifying poor plastering techniques.
2. Repair Small Cracks and Bubbles - Clean out debris and loose plaster from the damaged area. Use a suitable plaster filler or patching compound to repair small cracks and bubbles. Ensure a smooth finish by feathering the edges of the repair, blending it seamlessly with the surrounding plaster.
3. Replastering - In cases of extensive damage, remove the blown or loose plaster. Ensure the wall surface is clean, dry, and properly prepared for the new plaster application. Use the appropriate plaster mix and application techniques to re-plaster the affected area. Feather the edges and blend the new plaster with the existing surface for a cohesive finish.
4. Address Moisture Issues - Identify and repair any sources of water infiltration, such as roof leaks or plumbing issues. Enhance ventilation in the affected area to prevent the buildup of moisture. Consider applying damp-proofing solutions to protect against future moisture damage.
5. Use Flexible Materials - Incorporate elastomeric additives into the plaster mix to enhance flexibility and resistance to cracking. Apply fiberglass mesh over the damaged area before plastering to provide additional reinforcement.
6. Monitor and Prevent Recurrence - Conduct regular inspections of the repaired areas and the entire structure to catch potential issues early. Implement routine maintenance measures, such as cleaning gutters, inspecting roofs, and addressing any structural concerns.
7. Seek Professional Assistance - If the blown plaster is a result of structural issues, consult with a structural engineer to assess and address the underlying problems. Enlist the services of an experienced plasterer or contractor to ensure proper repairs and application techniques.
8. Consider Decorative Finishes - After remedying the blown plaster, consider applying texture or paint to enhance the aesthetics and provide an additional protective layer.
By combining these remedies and addressing both the immediate damage and the root causes, you can effectively restore blown plaster and ensure the long-term stability and appearance of your walls.
Tagged as: Blown Plaster, Crumbling Plaster
Share this post: